Setup overview
The connector setup process follows a consistent pattern across all data sources:Setup stages
- Source selection - Choose your data source and verify compatibility
- Authentication - Securely connect to your data source
- Data selection - Choose which data to sync
- Configuration - Set sync schedules and advanced options
- Testing & launch - Verify setup and start syncing
Source selection
Choose your connector
5X provides 600+ out-of-the-box connectors presented as a searchable list: How to find your connector:- Search by name - Use the search bar to find your desired source (e.g., “Google Sheets”, “Salesforce”, “PostgreSQL”)
- Browse the list - Scroll through the complete list of available connectors
- Request custom connectors - If a connector isn’t available, you can request it and it’s typically delivered within days
- SaaS applications - Salesforce, HubSpot, NetSuite, Zendesk, Shopify, Stripe
- Databases - PostgreSQL, MySQL, MongoDB, Redshift, Snowflake, BigQuery, Oracle
- Analytics platforms - Google Analytics, Facebook Ads, Mixpanel, Adobe Analytics
- File storage - Google Sheets, Amazon S3, Google Cloud Storage, FTP, SFTP
If a connector is not available in the catalog, you can request custom connectors, which are typically delivered within days. You can also ingest from modern APIs or legacy sources using custom integration blueprints maintained by 5X.
Verify compatibility
Before proceeding, check:- Data source version compatibility
- Network connectivity requirements
- Permission levels needed
- Data volume estimates
Destination selection
Each 5X workspace connects to a single data warehouse. Your destination for ingestion is configured through App Connections: How destinations work:- Single warehouse per workspace - Your workspace connects to one Snowflake account, BigQuery project(s), or Redshift cluster
- Multiple destinations within warehouse - Create different App Connections of type “Ingestion” to ingest to different schemas, databases, or locations within your warehouse
- App Connection setup - Destinations are created via Settings → App Connections by adding a new connection of type “Ingestion”
- Snowflake - Connect to your Snowflake account with different databases and schemas
- BigQuery - Import multiple projects during workspace setup, then create destinations for different datasets
- PostgreSQL - Connect to your PostgreSQL database with different schemas
- Redshift - Connect to your Redshift cluster with different databases and schemas
- S3 Data Lake - Connect to your S3 buckets for data lake storage
To set up ingestion destinations, you’ll need to create App Connections of type “Ingestion” from Settings → App Connections. Refer to Step 4: App Connections and Credentials for detailed setup instructions.
Authentication
Authentication methods
5X supports various authentication methods that differ based on your specific data source. Each connector presents the appropriate authentication options during setup:- OAuth 2.0
- API Keys & Tokens
- Database Credentials
- Service Accounts & Keys
OAuth 2.0 (Recommended when available)
- Secure authorization without sharing passwords
- Automatic token refresh for uninterrupted access
- Granular permissions control what data 5X can access
- Easy revocation from the source system
- Enhanced security with no password sharing
- Automatic credential management
- Fine-grained access control
- Simple credential revocation
Data selection
Schema discovery
Once authenticated, 5X automatically discovers your data source structure and presents it in an organized schema view: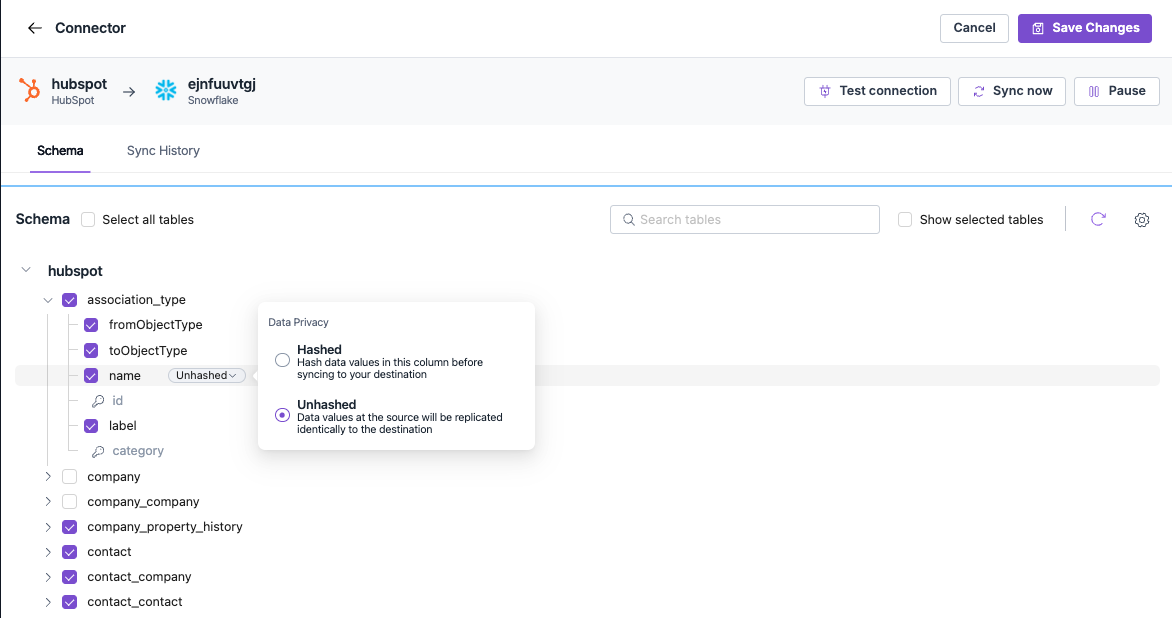
- Hierarchical structure - Your data source schema organized in a tree view
- Tables and fields - All available tables with their individual columns/fields
- Selection controls - Checkboxes to include or exclude specific tables and fields
- Search functionality - Find specific tables or fields quickly
- Data indicators - Some fields may show additional information (e.g., “Unhashed” for certain data types)
Table and field selection
The schema interface allows you to control exactly what data gets synced: Selection controls:- Individual checkboxes - Select or deselect specific tables and fields
- Select all tables - Quickly enable all available tables
- Show selected tables - Filter view to only display chosen tables
- Search tables - Find specific tables by name
Field-level control
Based on your selections, 5X will sync the chosen tables and fields: What gets synced:- Selected tables - Only tables with checkboxes enabled
- Selected fields - Only fields within those tables that are checked
- Automatic data types - 5X handles data type mapping automatically
- Field metadata - Some fields may include additional context (like hashing status)
The exact fields and data types available depend entirely on your specific data source. 5X presents whatever structure exists in your source system, so the interface will look different for each connector type.